Project Generation
It’s 2018, who does things manually anymore?
Hello again! Daniël “Build Mangler” Konings speaking here. You might remember me from the scripting blog post I did together with Rodi Lankester, but my role has shifted. Nothing is guaranteed in life after all, right? As I have the most experience with build mangling a project, we’ve decided it’d be best that I would tackle the beast that is CMake. With the beast tamed, it’s time to talk about the process in this blog post.
You might already be asking yourself; “but why?!”. Well, simply put, nobody enjoys manually setting up the project dependencies, includes and custom build steps within Visual Studio. Let alone the merging issues in version control. As we’re building a cross-platform engine, we like to have a lot of control over what happens where. This of course also applies on different platforms like Linux, where you use different IDEs.
Here are some classic quotes that explain the problems (that you’ve probably seen before...):
- “Oh, I forgot to configure Release as well..”
- “Guys! I don’t have the
includes!” - “I’m pretty sure I already linked that..”
- “Guys, is IntelliSense acting up, or does this file actually not exist?”
- “
error LNK2019: unresolved external symbol "public: __thiscall SomeTemplate<char>::~SomeTemplate<char>(void)" (??1?$SomeTemplate@D@@QAE@XZ) referenced in function _main” - “Oh.. But it works on my machine..”
- “Why is this squiggly line here?”

CMake
So what exactly is CMake[1]? Without getting too technical -- CMake is a C++ tool with which you can create cross-platform solutions from a single format. Whether you’re developing in Visual Studio[2] on Windows, QtCreator[3]/CLion[4] on Linux or XCode[5] on Mac; CMake does it all for you. These are just some examples, of course there are plenty IDEs out there, but I figured to mention some of the popular ones with CMake integration.
With so-called “CMakeLists.txt”s you can define what your project is going to contain. This includes (but is not limited to):
- Files added to the project (with respective filters)
- Include directories
- Linked libraries
- Multiple projects
- Preprocessor defines (macros)
- Custom build steps
- Find modules, to find respective libraries on the system
And the best part? Third-party libraries often come with their own “CMakeLists.txt”, so they’re really simple to add to you project!
Of course, it’s not completely true what was mentioned at the start. The process is not completely automatic; the CMakeLists still have to be defined manually. However, it does save a lot of time on platform-specific settings. CMake provides us with some variables to determine which platform we’re generating for, so we can do explicit generation steps based on this configuration.
PlayStation 4
Even though we’re not allowed to talk about this too much; it’s worth mentioning that one of the main purposes why we’re using CMake is for the PlayStation 4 part of the engine, which is completely different from the Windows configuration. Without going into detail, there’s a simple variable to generate a PlayStation 4 project, which turns off all CMake targets and dependencies not related to it; which brings me to the following point.
Setup
Our engine is split up in separate “modules”, which are separate targets in CMake. These modules can be turned on or off with simple booleans. For instance, a person working on only the core engine likely doesn’t want to build all the toolchain dependencies as well, so the tools section can be toggled off completely.
All of our dependencies that have a CMakeLists.txt are built together with our engine. This makes for easy modifications of the dependencies where necessary. A good example of this would be switching a dependency to MT/MD[6] on Windows. By not using pre-built binaries, this swap can easily be made. There is no need to go back and forth between building and copying over the binaries every time we want to make modifications.
Sulphur Generator
To keep all settings isolated and to do post-generation steps (as CMake doesn’t come with functionality to do any steps after the solutions are already generated), I made a simple tool in WinForms that does this.
It looks like this (which is not a rip-off of the CMake GUI tool at all...)
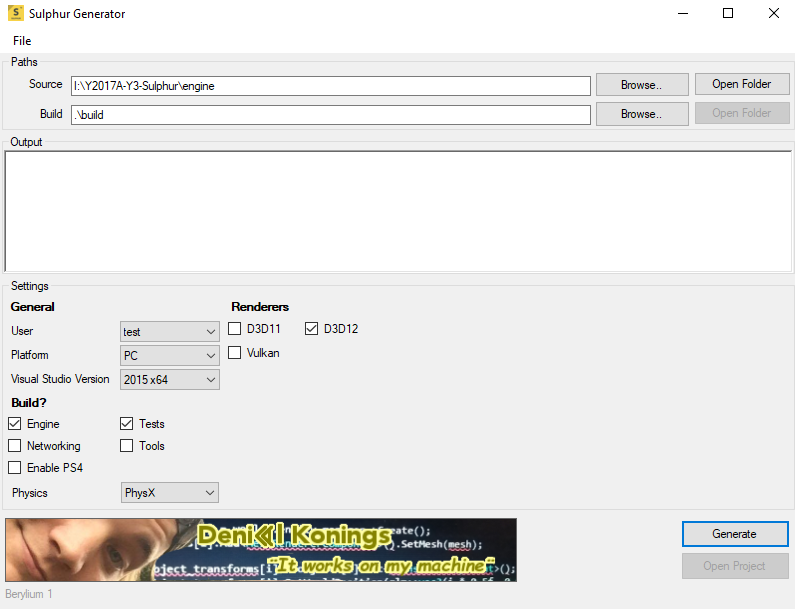
Anyway, as you can see; the tool has isolated settings, hiding all of the CMake variables set by dependencies. This makes our own project easier to configure. Custom steps are ran after the project generation on the PlayStation 4 platform, but could potentially be used on PC platforms as well.
Last but not least, there are random banners we create and upload ourselves, just for some giggles. ;)
Well, this is pretty long already..
There is not much else I’d like to mention here. I might go more into detail in future blog posts, but this is the general gist of it! Thank you for your time, stay legendary and until next time,
Daniël out.
References
[1] CMake, [Online]. Available: https://cmake.org/.
[2] Microsoft, “Visual Studio”, [Online]. Available: https://www.visualstudio.com/.
[3] Qt, “QtCreator”, [Online]. Available: https://www.qt.io/qt-features-libraries-apis-tools-and-ide/.
[4] Jet Brains, “CLion”, [Online]. Available: https://www.jetbrains.com/clion/.
[5] Apple, “XCode”, [Online]. Available: https://developer.apple.com/xcode/.
[6] Microsoft Developer Network, “/MD, /ML, /MT, /LD (Use Run-Time Library)”,
[Online]. Available: https://msdn.microsoft.com/en-us/library/aa278396(v=vs.60).aspx.